
Content
Table of Contents
introduction
Summary of key points
-
gin framework
-
Account management system uses token authentication
-
Use telegraf to collect and forward data
The advantage of using telegraf is that there are many plug-ins that can be used, such as http using json to transmit data.
ON DUPLICATE KEY UPDATEGROUP BYin MySQL
ON DUPLICATE KEY UPDATE is used to update the insert statement if it already exists, which is suitable for concurrent scenarios;
- Use errgroup.WithContext
Use Context to uniformly output errors and monitor the health status of multiple coroutines. When one coroutine hangs up, the others will automatically exit.
- Use time.NewTicker
Use ticker instead of cron when creating a scheduled task
-
Use terraform combined with ansible for private automatic deployment
-
Write technical documents in latex
resource
- Host host
Deploy reporter
Address: 172.18.176.188
SSH login, ssh root@172.18.176.188, no password required, already authorized
- Deploy telegraf
Address: (access from external network) “http://80.private-monitor.prj-private-dns.svc.c1.u4/telegraf”
Address: (access from management network) “http://private-monitor.prj-private-dns.svc.c1.uae/telegraf”
*
Pre-release/DEV: ipv4: 172.31.145.198 ipv6 :2002:ac1f:91c6::1 mysql port: 43092 monitor port: 43095 account root login method: mysql -h $ip -P $port -u root -p -D ipv6 method is the same as ipv4 root login password: Pwd_123456_Pwd
- physical host address
10.69.102.194
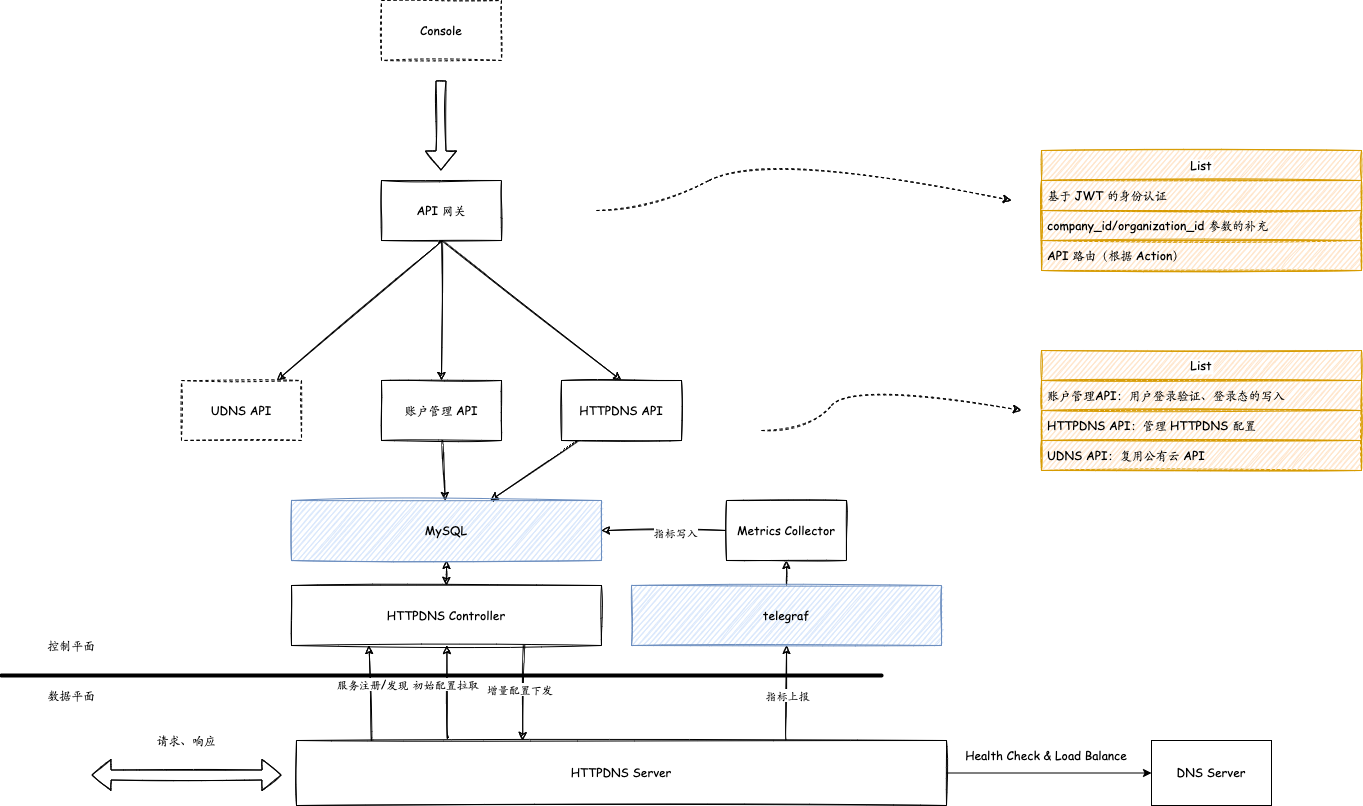
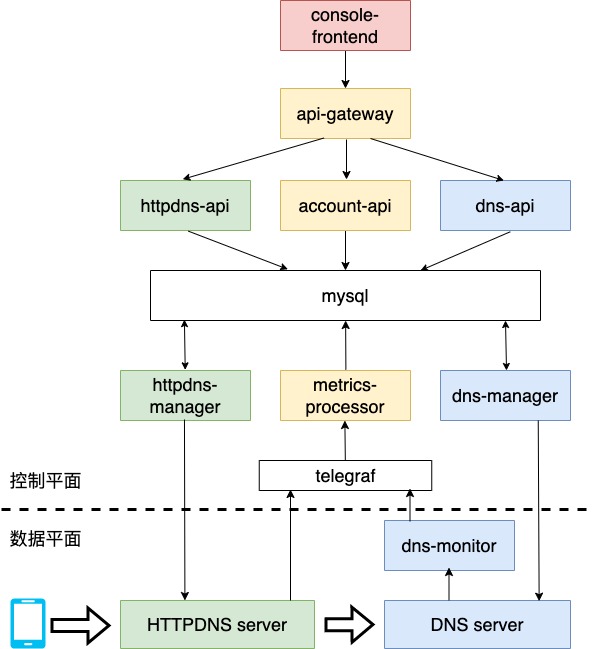
api-gateway
account-api
Solve concurrency problems
Case: The business requires that at least one administrator account be retained when deleting an account.
FOR UPDATE
Therefore, before executing the deletion operation, a query statement needs to be executed to query how many current administrator accounts there are. In order to prevent data inconsistency caused by executing query statements on multiple servers, the FOR UPDATE statement is used to lock the table, but then a write-write conflict error occurs.
Since the database uses TiDB, and the company’s database version is upgraded from 3.0 to 4.0, according to the description in the official document:
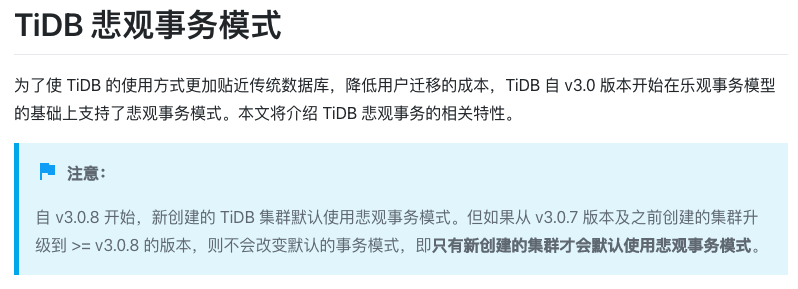
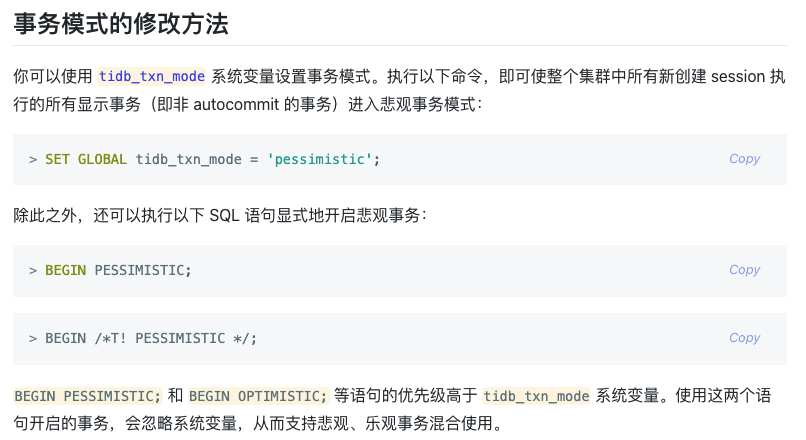
So the optimistic lock is enabled by default. In order to explicitly enable the pessimistic lock, the following statement needs to be executed:
However, after enabling pessimistic locking, write-write conflicts still occasionally occur, and this problem remains to be solved:
{"level":"info","request":"/DeleteAccount","response":"{\"RetCode\":500,\"Message\":\"fail to execute transaction: Error 9007: Write conflict, txnStartTS=430256198422626308, conflictStartTS=430256198422626313, conflictCommitTS=430256198435733505, key={tableID=774, handle=67} primary={tableID=774, handle=67} [try again later]\"}","time":"2022-01-04T11:52:23Z","message":"access"}
JWT generated token length is uncontrollable
Problem 1
The initial length of the token stored in mysql is set to 100, but the generated token will be truncated after exceeding 100
Problem 2
http The length of the request in the header is limited, usually 8k. If the token is too long, it may be automatically truncated in the header.
Preliminary solution
In order to solve the problem of too long token length, the initial solution is to change the original strategy of storing tokens to storing the MD5 code of the token. The fixed length of the MD5 code is 32 bytes. Although this problem can be initially solved, the use of MD5 code brings a derivative problem that MD5 codes may collide. Different tokens generating the same MD5 code will cause some security problems, and if the MD5 is not unique in the database, it will also cause some hidden bugs.
SHA256 algorithm
The collision probability of SHA256 algorithm is low, and the generated encryption result is 256 bits
Error code
| Retcode | Message |
|---|---|
| 101 | name is duplicated |
| 102 | account not found |
| 103 | account or password is not valid |
| 104 | token is not found |
| 105 | token is not valid |
| 106 | token type is not valid |
| 107 | token is expired |
| 108 | existing admin account is only 1 or less |
| 109 | database write conflict, try again later |
httpdns-api
Metrics-report-client
metrics-processor
telegraf
-
Input plugin
-
output plugin
cron job
In order to optimize database performance, you need to create a pre-lookup table.
The original table t_metric, when the data volume is at the level of tens of millions, will result in a query speed of 7-8s. In order to optimize, create a t_metric_one_min pre-lookup table to aggregate the data of each minute as a new data.
The main design idea is shown in the figure below:

This module is mainly divided into two scheduled tasks, one scheduled task is generator responsible for generating the table of scheduled tasks, t_job, and the other task is executor responsible for executing the tasks in t_job.
Notes
- Use
tickerinstead ofcronwhen creating scheduled tasks. The cron package will start another task at the specified time if the previous task has not been completed. In the case, the database needs to write a large amount of data for the first time. The time interval of the scheduled task is 1min. Therefore, if the first task is not completed, a lot of tasks will be started and executed repeatedly, causing the CPU to run full and the service to hang directly. Therefore, use ticker - Create a unique index
uniqueIndexand combine it with theINSERT INTO...ON DUPLICATE KEY UPDATE...statement to avoid repeated reading and writing of the database in the case of multiple servers. - Use
var panicChan chan interface{}to control the two coroutines of the two scheduled tasks
gjson
In the collector module, you need to read the http request sent from telegraf in json format. In order to parse the body in the request, and the request is already packaged in telegraf, the structure and definition contained in the request body are not very clear, so you need to use the gjson library for parsing.
Using the methods in the gjson library, you can quickly parse the byte format request body into a json structure and reference the variables in the body. Here, the two methods gjson.Get() result.Array() are mainly used to read arrays and read data according to variable names.
go routine
contex
sync.errgroup
chan
deploy
1. One-click deployment using Makefile
- Note:
One-click deployment using Makefile only supports creating resources using terraform and deploying services on resources created by terraform.
First, you need to refer to 2.1 Install terraform and 3.1 Install ansible to install the two applications terraform and ansible.
Then you need to refer to the setting environment section in 2.2 Create resources with terraform to set the environment variables.
Finally, use the make command for one-click deployment, as shown in the following example:
- example
# First, you need to enter the deploy/ path
# Deploy services
make build

# Clear all resources and services
make clean
2. terraform
Use terraform to create ucloud intranet load balancing (ULB) and backend server (Uhost)
2.1 Install terraform
Download and install: https://www.terraform.io/downloads
2.2 Create resources with terraform
- Set up the environment
export UCLOUD_PUBLIC_KEY="your public key"
export UCLOUD_PRIVATE_KEY="your private key"
export UCLOUD_PROJECT_ID="your project id"
- Configure ssh keys
ssh-keygen -t rsa
- Initialize terraform
# First, you need to enter the terraform folder
terraform init
- Execute terraform
terraform apply
- Return terraform output
terraform output

# Returns the specified value, such as the created uhost private_ip address
terraform output instance_private_ip_list

# Use -json and jq to query the specified host private_ip address
terraform output -json instance_private_ip_list | jq '.[0]'
- Delete resources
terraform destroy
- Create an inventory file that ansible depends on
According to the inventory.tmpl template file, terraform will create an inventory file that ansible depends on, which contains the private_ip of all newly created hosts
2.3 File Description
This section introduces the main configuration files of terraform. For parameter configuration of creating ucloud resources using terraform, please refer to this document: https://registry.terraform.io/providers/ucloud/ucloud/latest/docs
main.tf
Used to create resources such as ULB and Uhost.
# This module is used to generate inventory files
resource "local_file" "ansible_inventory" {
content = templatefile("inventory.tmpl",
{
instance_private_ip_list = ucloud_instance.web.*.private_ip
}
)
filename = "inventory"
}
variable.tf
Used to define variables needed in terraform. Users can customize variables such as “region”, “zone”, and “instance_password” in this file.
version.tf
Used to define the version number and provide information such as source manufacturers.
outputs.tf
Used to define the return information after terraform is created. This information is only returned to the console and can also be viewed using the terraform output command.
2.4 Reference links
- ucloud region and availability zone list: https://docs.ucloud.cn/api/summary/regionlist
- UHost Instance model table supported in Terraform: https://docs.ucloud.cn/terraform/specification/instance
3. ansible deployment
3.1 Install ansible
Download and install: https://ansible-tran.readthedocs.io/en/latest/docs/intro_installation.html
3.2 ansible deployment service
ansible uses playbook to manage deployment services
- Execute ansible-playbook command
# First, you need to enter the ansible folder
# Deploy the cloud host service created using terraform
ansible-playbook -i inventory site.yml

# Deploy the service using a custom server, and the server IP needs to be written in the hosts file
ansible-playbook -i hosts site.yml
3.3 Notes
- Add hosts
Open the hosts file (if you have used terraform to create the host, open the inventory file), and add the following to the bottom of the file:
[Client] # Customizable naming
172.16.100.9
172.16.100.10
...
- Configure SSH key authentication
If you use a custom server to deploy services, you need to configure SSH key authentication for each server. If you use the inventory file generated by terraform to deploy services, this is not necessary, as SSH keys have been configured in terraform.
ssh-copy-id root@<host1>
ssh-copy-id root@<host2>
...
- Modify parameters
You can define and modify the parameters that need to be passed in and the service modules that need to be deployed in site.yml
# vars defines the variables that need to be passed in
vars:
account_port: 1001
httpdns_port: 1002
metrics_processor_port: 2002
database_username: root
database_password: ucloud123
database_host: 10.23.152.247
...
# The services that need to be deployed are defined in the roles folder, and the value value is the subfolder name of the corresponding service in the roles folder
roles:
- account-api
- httpdns-api
...
- Change configuration files or binary files
If the configuration files or binary files are changed, you need to use the ansible-playbook -i inventory site.yml command again,
Ansible will automatically compare the changes and restart the service using the notify component in the main.yml file in the tasks folder of each service.