
Content
Table of Contents
Nosql Overview
NoSQL (NoSQL = Not Only SQL), which means “not only SQL”.
The amount of data is large and changes quickly, so relational databases such as MySQL are not enough.
Nosql Classification
K-V key-value pair
-
Sina: Redis
-
Meituan: Redis+Tair
-
Alibaba, Baidu: Redis+memecache
Document database (similar to JSON format)
-
MongoDB
-
A database based on distributed file storage, written in C++, mainly used to process large amounts of documents;
-
MongoDB is a product between relational databases and non-relational databases;
-
ConthDB
Column storage database
-
HBase
-
Distributed file system
Graph relational database
-
It stores relationships, such as social networks in Moments and advertising recommendations
-
Neo4J
Getting Started with Redis
Overview
What is Redis
Redis (Remote Dictionary Server), that is, remote dictionary service, is an open source ANSI Written in C language, it supports network, memory-based and persistent log-type, Key-Value database, and provides APIs in multiple languages. Since March 15, 2010, the development of Redis has been hosted by VMware. Since May 2013, the development of Redis has been sponsored by Pivotal.
Redis function
- Supports persistence operations, can persist aof and rdb data to disk, so as to perform data backup or data recovery operations, which is a good means to prevent data loss;
- High read and write efficiency, can be used for high-speed caching;
- Message queue, publish and subscribe system;
- Map information analysis
- Timer, counter (views)
Redis is recommended to be built on a Linux server
Linux installation and operation
- Download redis
wget https://download.redis.io/releases/redis-6.2.4.tar.gz
- Unzip redis
tar -zvxf redis-6.2.4.tar.gz
- Move to the opt directory
mv ./redis-6.2.4 ./opt/
- Enter the unzipped redis directory, install gcc, and execute the make command
cd opt/redis-6.2.4/

yum install gcc-c++

make
# Confirm that the environment is installed
make install
The default installation path of redis is /usr/local/bin
- Copy the redis configuration file to the
/usr/local/bindirectory
mkdir myconfig
cp /opt/redis-6.2.4/redis.conf myconfig/
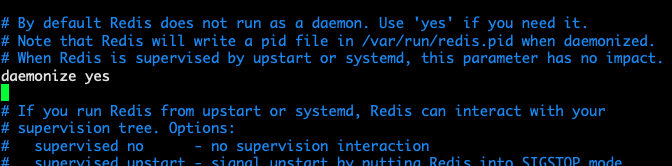
- redis is not started in the background by default, so you need to modify the configuration file
vim redis.conf
Change the parameter daemonize no to daemonize yes, so that redis can be started in the background
- Relevant instructions in the configuration file (novice tutorial)
| No. | Configuration item | Description |
|---|---|---|
| 1 | daemonize no |
Redis does not run as a daemon by default. This configuration item can be modified to enable the daemon with yes (Windows does not support the configuration of daemon threads as no ) |
| 2 | pidfile /var/run/redis.pid |
When Redis runs as a daemon, Redis will write the pid to the /var/run/redis.pid file by default. You can specify it through pidfile |
| 3 | port 6379 |
Specifies the Redis listening port. The default port is 6379. The author explained in one of his blog posts why 6379 was chosen as the default port, because 6379 corresponds to the number MERZ on the phone keypad, and MERZ is taken from the name of the Italian singer Alessia Merz |
| 4 | bind 127.0.0.1 |
Bound host address |
| 5 | timeout 300 |
How many seconds does the client close the connection after being idle? If 0 is specified, it means turning off this function |
| 6 | loglevel notice |
Specifies the logging level. Redis supports a total of four levels: debug, verbose, notice, and warning. The default is notice |
| 7 | logfile stdout |
Logging mode. The default is standard output. If Redis is configured to run as a daemon process, and the logging mode is configured as standard output here, the log will be sent to /dev/null |
| 8 | databases 16 |
Set the number of databases. The default database is 0. You can use the SELECT command to specify the database id on the connection. |
| 9 | save <seconds> <changes> The default Redis configuration file provides three conditions: save 900 1 save 300 10 save 60 10000, which respectively mean 1 change within 900 seconds (15 minutes), 10 changes within 300 seconds (5 minutes), and 10,000 changes within 60 seconds. |
Specify how long and how many update operations to synchronize data to the data file. Multiple conditions can be combined. |
| 10 | rdbcompression yes |
Specify whether to compress data when storing in the local database. The default is yes. Redis uses LZF compression. If you want to save CPU time, you can turn off this option, but it will make the database file huge. |
| 11 | dbfilename dump.rdb |
Specify the local database file name. The default value is dump.rdb |
| 12 | dir ./ |
Specify the local database storage directory |
| 13 | slaveof <masterip> <masterport> |
Set the IP address and port of the master service when the local machine is a slave service. When Redis starts, it will automatically synchronize data from the master. |
| 14 | masterauth <master-password> |
When the master service is password protected, the password of the slav service to connect to the master |
| 15 | requirepass foobared |
Set Redis Connection password. If a connection password is configured, the client needs to provide the password through the AUTH |
| 16 | ` maxclients 128` | Set the maximum number of client connections at the same time. By default, there is no limit. The number of client connections that Redis can open at the same time is the maximum number of file descriptors that the Redis process can open. If maxclients is set to 0, it means there is no limit. When the number of client connections reaches the limit, Redis will close the new connection and return the error message max number of clients reached to the client. |
| 17 | ` maxmemory |
Specify the maximum memory limit of Redis. Redis will load data into memory when it starts. When the maximum memory is reached, Redis will first try to clear expired or expiring keys. When this method is processed, the maximum memory setting is still reached, and write operations will no longer be possible, but read operations can still be performed. Redis’s new vm mechanism stores the key in memory and the value in the swap area |
| 18 | appendonly no |
Specifies whether to log after each update operation. Redis writes data to disk asynchronously by default. If it is not enabled, data may be lost for a period of time during a power outage. Because redis synchronizes data files according to the above save conditions, some data will only exist in memory for a period of time. The default is no |
| 19 | appendfilename appendonly.aof |
Specifies the update log file name, the default is appendonly.aof |
| 20 | appendfsync everysec |
Specifies the update log condition, with 3 optional values: no: Wait for the operating system to synchronize the data cache to the disk (fast) always: Manually call fsync() to write data to the disk after each update operation (slow, safe) everysec: Synchronize once per second (compromise, default value) |
| 21 | vm-enabled no |
Specifies whether to enable the virtual memory mechanism. The default value is no. To briefly introduce, the VM mechanism stores data in pages. Redis swaps the less visited pages, i.e. cold data, to the disk, and the more visited pages are automatically swapped out from the disk to the memory (I will analyze the VM mechanism of Redis in detail in the following article) |
| 22 | vm-swap-file /tmp/redis.swap |
Virtual memory file path. The default value is /tmp/redis.swap. It cannot be shared by multiple Redis instances. |
| 23 | vm-max-memory 0 |
All data larger than vm-max-memory is stored in virtual memory. No matter how small vm-max-memory is set, all index data is stored in memory (Redis index data is keys). In other words, when vm-max-memory is set to 0, all values are actually on disk. The default value is 0 |
| 24 | vm-page-size 32 |
Redis swap files are divided into many pages. An object can be stored on multiple pages, but a page cannot be shared by multiple objects. vm-page-size is set according to the size of the stored data. The author recommends that if you store many small objects, the page size should be set to 32 or 64 bytes; if you store very large objects, you can use a larger page. If you are not sure, use the default value. |
| 25 | vm-pages 134217728 |
Set the number of pages in the swap file. Since the page table (a bitmap that indicates whether a page is free or in use) is placed in memory, every 8 pages on the disk will consume 1 byte of memory. |
| 26 | vm-max-threads 4 |
Set the number of threads accessing the swap file. It is best not to exceed the number of cores on the machine. If it is set to 0, all operations on the swap file are serial, which may cause a relatively long delay. The default value is 4 |
| 27 | glueoutputbuf yes |
Set whether to merge smaller packets into one packet when responding to the client. The default is on. |
| 28 | hash-max-zipmap-entries 64 hash-max-zipmap-value 512 |
Specifies that a special hashing algorithm is used when a certain number of entries is exceeded or the largest element exceeds a certain critical value. |
| 29 | activerehashing yes |
Specifies whether to activate the reset hash. The default is on (detailed introduction when introducing the hashing algorithm of Redis later) |
| 30 | include /path/to/local.conf |
Specifies to include other configuration files. The same configuration file can be used between multiple Redis instances on the same host, while each instance has its own specific configuration file. |
- Start the redis service
# Switch to the /usr/local/bin directory
cd ..

# Start redis using the configuration file
redis-server myconfig/redis.conf

# Use the client to connect to redis, the local default port number is 6379
redis-cli -p 6379

# After connecting, ping outputs pong, the connection is successful
127.0.0.1:6379> ping
PONG

# Enter the key-value pair test
127.0.0.1:6379> set name jay
OK
127.0.0.1:6379> get name
"jay"
- Shut down the Redis service
127.0.0.1:6379> SHUTDOWN
not connected> exit
redis-benchmark test
Redis-benchmark is a stress testing tool that can be used to test redis performance.
- Optional parameters for performance testing
| Serial number | Option | Description | Default value |
| 1 | -h | Specify server host name | 127.0.0.1 |
| 2 | -p | Specify server port | 6379 |
| 3 | -s | Specify server socket | |
| 4 | -c | Specify number of concurrent connections | 50 |
| 5 | -n | Specify number of requests | 10000 |
| 6 | -d | Specify data size of SET/GET value in bytes | 2 |
| 7 | -k | 1=keep alive 0=reconnect | 1 |
| 8 | -r | Use random key for SET/GET/INCR, and random value for SADD | |
| 9 | -P | Pipe |
1 |
| 10 | -q | Force quit redis. Show only query/sec values | |
| 11 | –csv | Output in CSV format | |
| 12 | *-l*(lowercase L) | Generate loop, execute tests forever | |
| 13 | -t | Run only comma-separated list of test commands. | |
| 14 | *-I*(uppercase i) | Idle mode. Open only N idle connections and wait. |
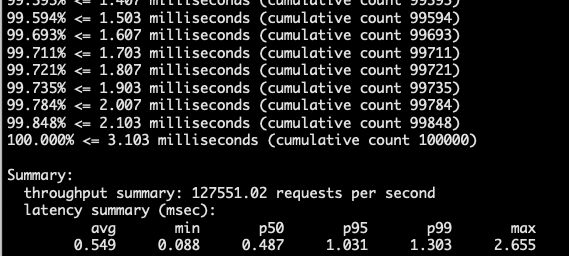
# Test: 100 concurrent connections, 100,000 requests
redis-benchmark -h localhost -p 6379 -c 100 -n 100000
- Test results
Test each command:
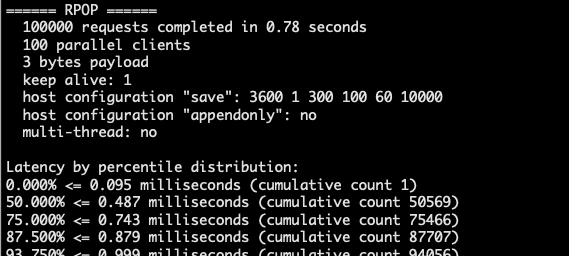
Test result statistics:
Redis commands
redis has 16 databases by default, and the first database is used by default. You can
- Use
selectto switch databases
127.0.0.1:6379> select 3 # Switch to the fourth database
OK
127.0.0.1:6379[3]> dbsize # View database size
(integer) 0
flushdbClear the current databaseflushallClear all databases- Default port number: 6379, which is the number corresponding to the name of a female star MERZ on the mobile phone keyboard
Redis is based on memory operations. The CPU is not the performance bottleneck of Redis. The machine memory and network bandwidth will limit Redis performance. Redis stores all data in memory and does not involve CPU context switching (multi-threading), so it is the most efficient.
Redis keys commands
The official website has a detailed explanation of all commands: https://redis.io/commands
| Serial number | Command and description |
|---|---|
| 1 | DEL key This command is used to delete a key if it exists. |
| 2 | DUMP key Serializes the given key and returns the serialized value. |
| 3 | EXISTS key Checks whether the given key exists. |
| 4 | EXPIRE key seconds Sets an expiration time for the given key in seconds. |
| 5 | EXPIREAT key timestamp The function of EXPIREAT is similar to EXPIRE, both are used to set the expiration time for the key. The difference is that the time parameter accepted by the EXPIREAT command is a UNIX timestamp (unix timestamp). |
| 6 | PEXPIRE key milliseconds Set the expiration time of the key in milliseconds. |
| 7 | PEXPIREAT key milliseconds-timestamp Set the timestamp (unix timestamp) of the key expiration time in milliseconds |
| 8 | KEYS pattern Find all keys that match the given pattern. |
| 9 | MOVE key db Move the key of the current database to the given database db. |
| 10 | PERSIST key Remove the expiration time of the key, and the key will be persisted. |
| 11 | PTTL key Returns the remaining expiration time of a key in milliseconds. |
| 12 | TTL key Returns the remaining TTL (time to live) of a given key in seconds. |
| 13 | RANDOMKEY Returns a random key from the current database. |
| 14 | RENAME key newkey Modify the name of a key |
| 15 | RENAMENX key newkey Rename key to newkey only if newkey does not exist. |
| 16 | [SCAN cursor MATCH pattern] [COUNT count] Iterate over database keys in a database. |
| 17 | TYPE key Returns the type of the value stored by key. |
Redis data types
Redis supports five data types: string, hash, list, set, and zset (sorted set).
String
String is the most basic type of redis. You can think of it as the same type as Memcached, with one key corresponding to one value.
The string type is binary safe. This means that redis strings can contain any data. For example, jpg images or serialized objects.
The string type is the most basic data type of Redis. The value of the string type can store up to 512MB.
- Example
redis 127.0.0.1:6379> SET runoob "Rookie Tutorial"
OK
redis 127.0.0.1:6379> GET runoob
"Rookie Tutorial"
In the above example, we used Redis’s SET and GET commands. The key is runoob, and the corresponding value is Rookie Tutorial.
**Note: **A key can store up to 512MB.
String commands
| Serial number | Command and description |
|---|---|
| 1 | SET key value Set the value of the specified key |
| 2 | GET key Get the value of the specified key. |
| 3 | GETRANGE key start end Return the substring of the string value in key |
| 4 | GETSET key value Set the value of the given key to value and return the old value of key. |
| 5 | GETBIT key offset Get the bit at the specified offset of the string value stored by key. |
| 6 | [MGET key1 key2..] Get all (one or more) values of a given key. |
| 7 | SETBIT key offset value Set or clear the bit at the specified offset of the string value stored by key. |
| 8 | SETEX key seconds value Associate the value value to key and set the expiration time of key to seconds (in seconds). |
| 9 | SETNX key value Set the value of key only if key does not exist. |
| 10 | SETRANGE key offset value Overwrite the string value stored by the given key with the value parameter, starting at offset offset. |
| 11 | STRLEN key Returns the length of the string value stored by key. |
| 12 | [MSET key value key value …] Set one or more key-value pairs at the same time. |
| 13 | [MSETNX key value key value …] Set one or more key-value pairs at the same time, if and only if all given keys do not exist. |
| 14 | PSETEX key milliseconds value This command is similar to the SETEX command, but it sets the key lifetime in milliseconds instead of seconds as the SETEX command does. |
| 15 | INCR key Increase the numeric value stored in key by one. |
| 16 | INCRBY key increment Add the value stored in key to the given increment value. |
| 17 | INCRBYFLOAT key increment Add the given floating point increment value to the value stored in key. |
| 18 | DECR key Decrement the numeric value stored in key by one. |
| 19 | DECRBY key decrement Subtract the given decrement value from the value stored in key. |
| 20 | APPEND key value If key already exists and is a string, the APPEND command appends the specified value to the end of the original value of the key. |
Usage scenarios of string
- Counter
Hash
Redis hash is a set of key=>value pairs.
Redis hash is a mapping table of string type fields and values. Hash is particularly suitable for storing objects.
Example
DEL runoob is used to delete the key used in the previous test, otherwise an error will be reported: (error) WRONGTYPE Operation against a key holding the wrong kind of value
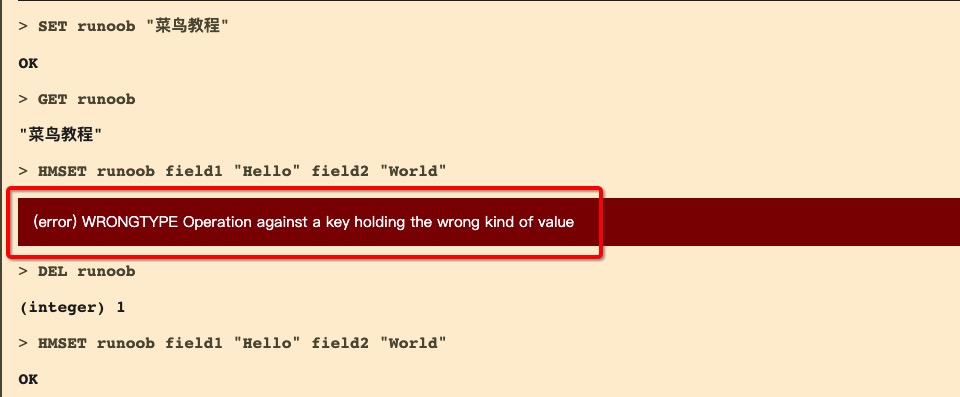
redis 127.0.0.1:6379> DEL runoob
redis 127.0.0.1:6379> HMSET runoob field1 "Hello" field2 "World"
"OK"
redis 127.0.0.1:6379> HGET runoob field1
"Hello"
redis 127.0.0.1:6379> HGET runoob field2
"World"
In the example, we used Redis HMSET, HGET commands. HMSET sets two field=>value pairs, and HGET obtains the value corresponding to the corresponding field.
Each hash can store 232 -1 key-value pairs (more than 4 billion).
Hash table commands
| Serial number | Command and description |
|---|---|
| 1 | [HDEL key field1 field2] Delete one or more hashes Table fields |
| 2 | HEXISTS key field Check if the specified field exists in the hash table key. |
| 3 | HGET key field Get the value of the specified field stored in the hash table. |
| 4 | HGETALL key Get all fields and values of the specified key in the hash table |
| 5 | HINCRBY key field increment Add increment to the integer value of the specified field in the hash table key. |
| 6 | HINCRBYFLOAT key field increment adds increment to the floating point value of the specified field in the hash table key. |
| 7 | HKEYS key Get all fields in the hash table |
| 8 | HLEN key Get the number of fields in the hash table |
| 9 | [HMGET key field1 field2] Get the value of all given fields |
| 10 | [HMSET key field1 value1 field2 value2 ] Set multiple field-value pairs to the hash table key at the same time. |
| 11 | HSET key field value Set the value of the field field in the hash table key to value. |
| 12 | HSETNX key field value Set the value of the hash table field only if the field field does not exist. |
| 13 | HVALS key Get all values in the hash table. |
| 14 | [HSCAN key cursor MATCH pattern] [COUNT count] Iterate over the key-value pairs in the hash table. |
List
Redis lists are simple lists of strings, sorted in the order they were inserted. You can add an element to the head (left side) or tail (right side) of a list.
Example
redis 127.0.0.1:6379> DEL runoob
redis 127.0.0.1:6379> lpush runoob redis
(integer) 1
redis 127.0.0.1:6379> lpush runoob mongodb
(integer) 2
redis 127.0.0.1:6379> lpush runoob rabbitmq
(integer) 3
redis 127.0.0.1:6379> lrange runoob 0 10
1) "rabbitmq"
2) "mongodb"
3) "redis"
redis 127.0.0.1:6379>
The table can store up to 232 - 1 elements (4294967295, Each list can store more than 4 billion).
List related commands
| Serial number | Command and description |
|---|---|
| 1 | [BLPOP key1 key2 ] timeout Remove and get the first element of the list. If there is no element in the list, the list will be blocked until the wait timeout or a pop-up element is found. |
| 2 | [BRPOP key1 key2 ] timeout Remove and get the last element of the list. If there is no element in the list, the list will be blocked until the wait timeout or a pop-up element is found. |
| 3 | BRPOPLPUSH source destination timeout Pop a value from a list, insert the popped element into another list and return it; if there is no element in the list, the list will be blocked until the wait timeout or a pop-up element is found. |
| 4 | LINDEX key index Get an element in a list by index |
| 5 | LINSERT key BEFORE|AFTER pivot value Insert an element before or after an element in a list |
| 6 | LLEN key Get the length of a list |
| 7 | LPOP key Remove and get the first element of a list |
| 8 | [LPUSH key value1 value2] Insert one or more values at the head of a list |
| 9 | LPUSHX key value Insert a value to the head of an existing list |
| 10 | LRANGE key start stop Get the elements in the specified range of the list |
| 11 | LREM key count value Remove list elements |
| 12 | LSET key index value Set the value of a list element by index |
| 13 | LTRIM key start stop Trim a list, that is, keep only the elements in the specified interval, and delete the elements outside the specified interval. |
| 14 | RPOP key Remove the last element of a list and return the removed element. |
| 15 | RPOPLPUSH source destination Remove the last element of a list and add it to another list and return it |
| 16 | [RPUSH key value1 value2] Add one or more values to a list |
| 17 | RPUSHX key value Add values to an existing list |
Set
Redis’s Set is an unordered collection of string type.
The set is implemented by a hash table, so the complexity of adding, deleting, and searching is O(1).
- sadd command
Add a string element to the set corresponding to the key, and return 1 if successful, and return 0 if the element is already in the set.
sad key member
Example
redis 127.0.0.1:6379> DEL runoob
redis 127.0.0.1:6379> sadd runoob redis
(integer) 1
redis 127.0.0.1:6379> sadd runoob mongodb
(integer) 1
redis 127.0.0.1:6379> sadd runoob rabbitmq
(integer) 1
redis 127.0.0.1:6379> sadd runoob rabbitmq
(integer) 0
redis 127.0.0.1:6379> smembers runoob

1) "redis"
2) "rabbitmq"
3) "mongodb"
Note: In the above example, rabbitmq is added twice, but due to the uniqueness of the elements in the set, the second inserted element will be ignored.
The maximum number of members in a set is 232 - 1 (4294967295, each set can store more than 4 billion members).
set command
| Serial number | Command and description |
|---|---|
| 1 | [SADD key member1 member2] Add one or more members to a set |
| 2 | SCARD key Get the number of members in a set |
| 3 | [SDIFF key1 key2] Returns the difference between the first set and the other sets. |
| 4 | [SDIFFSTORE destination key1 key2] Returns the difference of all given sets and stores it in destination |
| 5 | [SINTER key1 key2] Returns the intersection of all given sets |
| 6 | [SINTERSTORE destination key1 key2] Returns the intersection of all given sets and stores it in destination |
| 7 | SISMEMBER key member Determines whether the member element is a member of the set key |
| 8 | SMEMBERS key Returns all members in a set |
| 9 | SMOVE source destination member Moves the member element from the source set to the destination set |
| 10 | SPOP key Remove and return a random element from a set |
| 11 | [SRANDMEMBER key count] Return one or more random numbers from a set |
| 12 | [SREM key member1 member2] Remove one or more members from a set |
| 13 | [SUNION key1 key2] Return the union of all given sets |
| 14 | [SUNIONSTORE destination key1 key2] The union of all given sets is stored in the destination set |
| 15 | [SSCAN key cursor MATCH pattern] [COUNT count] Iterate elements in a set |
zset (sorted set)
Redis zset is a set of string elements like set, and does not allow duplicate members.
The difference is that each element is associated with a double score. Redis uses the score to sort the members in the set from small to large.
The members of zset are unique, but the scores can be repeated.
- zadd command
Add an element to a set. If the element exists in the set, update the corresponding score
zadd key score member
Example
redis 127.0.0.1:6379> DEL runoob
redis 127.0.0.1:6379> zadd runoob 0 redis
(integer) 1
redis 127.0.0.1:6379> zadd runoob 0 mongodb
(integer) 1
redis 127.0.0.1:6379> zadd runoob 0 rabbitmq
(integer) 1
redis 127.0.0.1:6379> zadd runoob 0 rabbitmq
(integer) 0
redis 127.0.0.1:6379> ZRANGEBYSCORE runoob 0 1000
1) "mongodb"
2) "rabbitmq"
3) "redis"
sorted set command
| Serial number | Command and description |
|---|---|
| 1 | [ZADD key score1 member1 score2 member2] Add one or more members to a sorted set, or update the score of an existing member |
| 2 | ZCARD key Get the number of members in a sorted set |
| 3 | ZCOUNT key min max Calculate the number of members with a specified interval score in a sorted set |
| 4 | ZINCRBY key increment member Add increment increment to the score of the specified member in the sorted set |
| 5 | [ZINTERSTORE destination numkeys key key …] Calculate the intersection of one or more given sorted sets and store the result set in the new sorted set destination |
| 6 | ZLEXCOUNT key min max Calculate the number of members in the specified dictionary range in the sorted set |
| 7 | [ZRANGE key start stop WITHSCORES] Return the members in the specified interval of the sorted set by index range |
| 8 | [ZRANGEBYLEX key min max LIMIT offset count] Returns a member of an ordered set by dictionary range |
| 9 | [ZRANGEBYSCORE key min max WITHSCORES] [LIMIT] Returns a member of an ordered set by score in a specified range |
| 10 | ZRANK key member Returns the index of a specified member in an ordered set |
| 11 | [ZREM key member member …] Removes one or more members from an ordered set |
| 12 | ZREMRANGEBYLEX key min max Remove all members of a given lexicographic interval from an ordered set |
| 13 | ZREMRANGEBYRANK key start stop Remove all members of a given rank interval from an ordered set |
| 14 | ZREMRANGEBYSCORE key min max Remove all members of a given score interval from an ordered set |
| 15 | [ZREVRANGE key start stop WITHSCORES] Returns members in a specified interval in an ordered set, by index, from high to low scores |
| 16 | [ZREVRANGEBYSCORE key max min WITHSCORES] Returns the members in the specified score range in the ordered set, sorted from high to low |
| 17 | ZREVRANK key member Returns the ranking of the specified member in the ordered set, and the ordered set members are sorted in descending order by score value (from large to small) |
| 18 | ZSCORE key member Returns the score value of the member in the ordered set |
| 19 | [ZUNIONSTORE destination numkeys key key …] Calculate the union of one or more given sorted sets and store them in a new key |
| 20 | [ZSCAN key cursor MATCH pattern] [COUNT count] Iterate over the elements in a sorted set (including element members and element scores) |
Three special data types
Redis GEO geographic location
Refer to the official documentation,
GEOADD
Add the specified geographic spatial location (latitude, longitude, name) to the specified key. These data will be stored in the sorted set in order to facilitate the use of GEORADIUS or GEORADIUSBYMEMBER commands to perform radius queries on the data.
The command takes x,y parameters in standard format, so longitude must come before latitude. The limits of these coordinates are indexable, and areas can be very close to the poles but cannot be indexed. The specific limits are specified by EPSG:900913 / EPSG:3785 / OSGEO:41001 as follows:
- Valid longitudes are from -180 degrees to 180 degrees.
- Valid latitudes are from -85.05112878 degrees to 85.05112878 degrees.
When the coordinate position is outside the specified range, the command will return an error.
# GEOADD add location
127.0.0.1:6379> GEOADD China:city 116.40 39.90 beijing
(integer) 1
127.0.0.1:6379> GEOADD China:city 121.47 31.23 shanghai
(integer) 1
127.0.0.1:6379> GEOADD China:city 106.50 29.53 chongqing
(integer) 1
127.0.0.1:6379> GEOADD China:city 114.05 22.52 shenzhen
(integer) 1
GEOPOS
Returns the location (latitude and longitude) of all given location elements from key.
127.0.0.1:6379> GEOPOS China:city beijing
1) 1) "116.39999896287918091"
2) "39.90000009167092543"
GEODIST
Returns the distance between two given locations.
If one of the two locations does not exist, the command returns a null value.
The unit parameter must be one of the following units:
-
m indicates that the unit is meters.
-
km indicates that the unit is kilometers.
-
mi indicates that the unit is miles.
-
ft indicates that the unit is feet.
If the user does not explicitly specify the unit parameter, then GEODIST uses meters as the unit by default.
The GEODIST command assumes that the earth is perfectly spherical when calculating distances. In extreme cases, this assumption can cause errors of up to 0.5%.
# Calculate the distance from Beijing to Shanghai
127.0.0.1:6379> GEODIST China:city beijing shanghai km
"1067.3788"
GEORADIUS
With the given longitude and latitude as the center, return all the location elements contained in the key whose distance from the center does not exceed the given maximum distance.
The range can use one of the following units:
-
m indicates that the unit is meters.
-
km indicates that the unit is kilometers.
-
mi indicates that the unit is miles.
-
ft indicates that the unit is feet.
The command will return additional information when the following options are given:
WITHDIST: Return the distance between the location element and the center together with the location element. The distance unit is consistent with the range unit given by the user.WITHCOORD: Return the longitude and latitude of the location element.WITHHASH: Return the ordered set score of the location element encoded by the original geohash in the form of a 52-bit signed integer. This option is mainly used for low-level applications or debugging, and is not very useful in practice.
The command returns unsorted location elements by default. The user can specify the sorting method of the returned location elements through the following two parameters:
ASC: Return location elements from near to far based on the location of the center.DESC: Return location elements from far to near based on the location of the center.
# Query the location within 1000km of (110, 30)
127.0.0.1:6379> GEORADIUS China:city 110 30 1000 km
1) "chongqing"
2) "shenzhen"
# Output the distance at the same time
127.0.0.1:6379> GEORADIUS China:city 110 30 1000 km withdist
1) 1) "chongqing"
2) "341.9374"
2) 1) "shenzhen"
2) "924.6408"
GEORADIUSBUMENMBER
This command is the same as the GEORADIUS command, both of which can find elements within the specified range, but The center point of GEORADIUSBYMEMBER is determined by the given location element, rather than using the input longitude and latitude to determine the center like GEORADIUS.
127.0.0.1:6379> GEORADIUSBYMEMBER China:city beijing 1000 km
1) "beijing"
GEOHASH
Returns a Geohash representation of one or more location elements.
GEO is implemented using Zset at the bottom layer, so you can use Zset commands to operate GEO
127.0.0.1:6379> ZRANGE China:city 0 -1
1) "chongqing"
2) "shenzhen"
3) "shanghai"
4) "beijing"
Hyperloglog
A HyperLogLog is a probabilistic data structure used in order to count unique things (technically this is referred to estimating the cardinality of a set).
Counting non-repeating elements, such as website visit statistics (one person logs in repeatedly, only counted once)
| Serial number | Command and description |
|---|---|
| 1 | [PFADD key element element …] Add the specified element to HyperLogLog. |
| 2 | [PFCOUNT key key …] Returns the cardinality estimate of a given HyperLogLog. |
| 3 | [PFMERGE destkey sourcekey sourcekey …] Merge multiple HyperLogLogs into one HyperLogLog |
If fault tolerance is allowed, Hyperloglog can be used;
If fault tolerance is not allowed, set can be used;
bitmaps
Bitmaps are not an actual data type, but a set of bit-oriented operations defined on the String type. Since strings are binary safe blobs and their maximum length is 512 MB, they are suitable to set up to 232 different bits.
Bit storage
# Use bitmap to record punch-ins from Monday to Sunday
# Monday: 1 Tuesday: 0 Wednesday: 0 Thursday: 1

127.0.0.1:6379> SETBIT sign 0 1
(integer) 0
127.0.0.1:6379> SETBIT sign 1 0
(integer) 0
127.0.0.1:6379> SETBIT sign 2 0
(integer) 0
127.0.0.1:6379> SETBIT sign 3 1
(integer) 0

# Check if you have clocked in on a certain day
127.0.0.1:6379> GETBIT sign 2
(integer) 0
127.0.0.1:6379> GETBIT sign 3
(integer) 1

# Count the number of days you have clocked in this week
127.0.0.1:6379> BITCOUNT sign
(integer) 2
Advanced Redis
Transactions Transaction
Transaction is equivalent to placing a command in a queue for execution, once;
Redis single command guarantees atomicity, but food does not guarantee atomicity;
Redis transaction has no concept of isolation level;
Execute a transaction
Transaction related commands
| Sequence number | Command and description |
|---|---|
| 1 | DISCARD Cancel the transaction and abandon the execution of all commands in the transaction block. |
| 2 | EXEC Execute all commands in the transaction block. |
| 3 | MULTI Mark the start of a transaction block. |
| 4 | UNWATCH Unwatch all keys of the WATCH command. |
| 5 | WATCH key [key …] Watch one (or more) keys. If this (or these) keys are modified by other commands before the transaction is executed, the transaction will be interrupted. |
# Start a transaction
127.0.0.1:6379> MULTI
OK
127.0.0.1:6379(TX)> SET k1 v1
QUEUED
127.0.0.1:6379(TX)> SET k2 v2
QUEUED
127.0.0.1:6379(TX)> GET k2
QUEUED
# End and execute the transaction
127.0.0.1:6379(TX)> EXEC
1) OK
2) OK
3) "v2"
Definition of atomicity: 1. Either all executions succeed, or none of them execute if there is an exception; 2. After an exception occurs, it can be rolled back, as if it had never been executed; after a Redis transaction exception occurs, other commands are still executed, and no rollback occurs. Most Redis exceptions are caused by command syntax errors.
Watch monitoring
- Pessimistic lock
Think that everything will go wrong, and it will be locked no matter what you do;
- Optimistic lock
Think that nothing will go wrong at any time, so it will not be locked. When updating data, determine whether someone has modified the data during this period;
-
Get version
-
Compare versions when updating
127.0.0.1:6379> SET money 100
OK
127.0.0.1:6379> set out 0
OK
127.0.0.1:6379> watch money # Monitor money object
OK
127.0.0.1:6379> multi
OK
127.0.0.1:6379(TX)> decrby money 20 # Data has not been changed during this period, normal
QUEUED
127.0.0.1:6379(TX)> incrby out 20
QUEUED
127.0.0.1:6379(TX)> exec
1) (integer) 80
2) (integer) 20
In a transaction, multiple threads modify values, and watch can be used as a redis optimistic lock operation
# Window 1 execution
127.0.0.1:6379>
127.0.0.1:6379> watch money
OK
127.0.0.1:6379> multi
OK
127.0.0.1:6379(TX)> DECRBY money 10
QUEUED
127.0.0.1:6379(TX)> INCRBY out 10
QUEUED
# Window 2 executes
127.0.0.1:6379> set money 1000
OK
# Window 1 continues to execute
127.0.0.1:6379(TX)> exec
(nil)
In this process, watch keeps monitoring whether the value of money remains the same before and after the command is executed.
Persistence Operation
RDB (Redis DataBase)
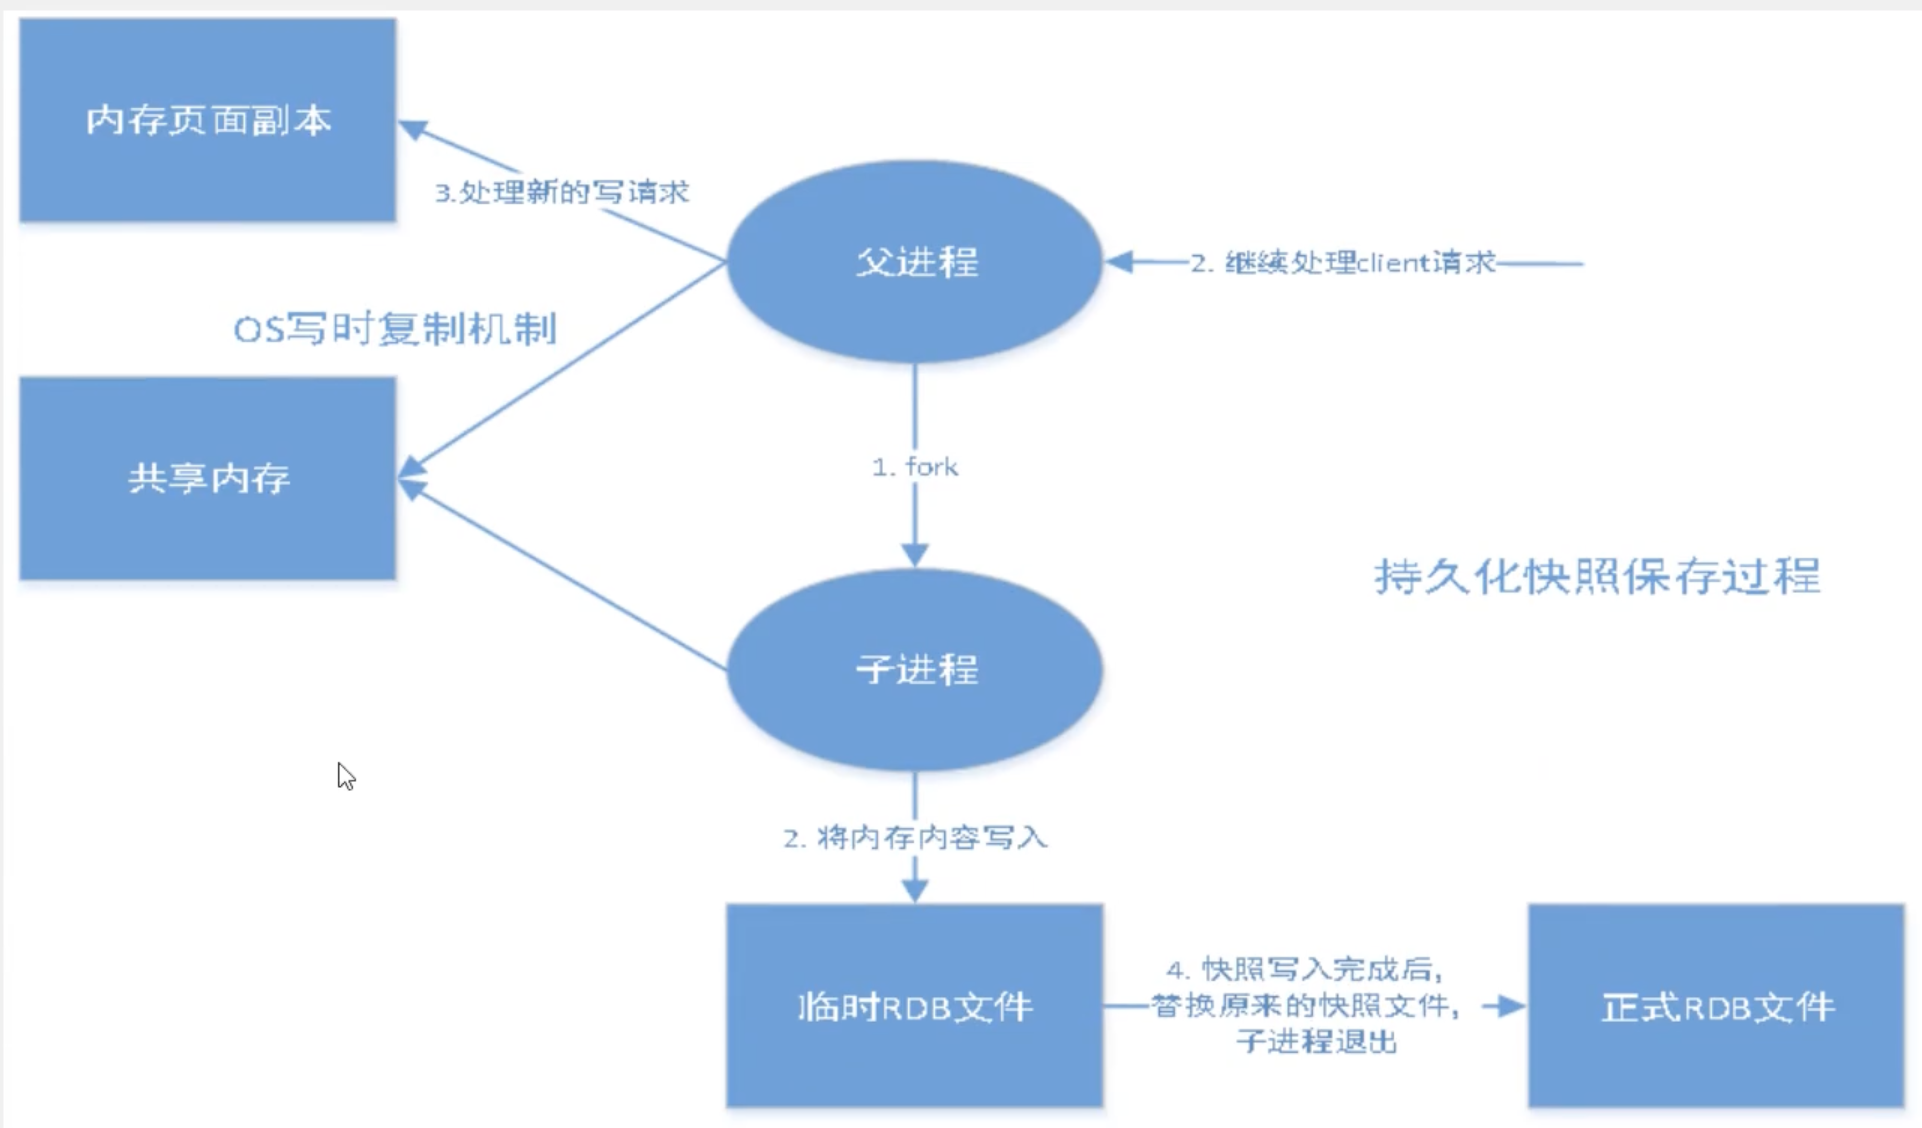
Redis will create (fork) a child process to write data to a temporary file. When the writing process is completed, the file will be updated to the latest persistent file. During the whole process, the main process does not perform any IO operations, ensuring extremely high performance. If large-scale data recovery is required and the integrity of data recovery is not very sensitive, using RDB is more efficient than AOF.
The default method is to use RDB for persistence, and generally no configuration modification is required.
The file saved by RDB is dump.rdbIn the configuration file, modifying the save parameter save 60 5 means that modifying k 5 times within 60 seconds can trigger RDB operation and generate dump.rdb file
Trigger mechanism
-
When the save rule is met, the rdb operation will be automatically triggered;
-
Executing the flushall command will trigger the rdb operation;
-
Exiting Redis will trigger the rdb operation;
How to use the rdb file to restore Redis
As long as the rdb file is placed in the redis startup directory, redis will automatically check dump.rdb when it starts and restore the data in it;
# Get the redis startup directory
127.0.0.1:6379> config get dir
1) "dir"
2) "/usr/local/bin"
- Advantages of RDB operation
Suitable for large-scale data recovery;
- Disadvantages of RDB operation
Requires a certain time interval for operation;
If redis crashes unexpectedly, the last modified data cannot be saved;
When forking a process, it will occupy a certain amount of memory space;
AOF (Append Only File)
Record all commands and execute all commands once when recovery is needed instead of relying on the backup database.
Record each write operation in the form of a log, record all instructions executed by Redis, only append files, do not rewrite files, and read the file to rebuild the data at the beginning of redie startup. In other words, if redis is restarted, it will execute once according to the instructions in the log file to complete data recovery.
Not enabled by default, you need to change the appendonly item in the configuration file to yes;
AOF file recovery redis
After restarting Redis, the AOF file will be loaded.
Abnormal repair command: redis-check-aof –fix for repair
- AOF advantages
AOF persistence method provides a variety of synchronization frequencies. Even if the default synchronization frequency is used once a second, Redis will lose at most 1 second of data;
- Disadvantages
aof files are much larger than rdb, and the repair speed is slower than RDB;
aof operation efficiency is lower than RDB;
How to choose a persistence solution
If you can tolerate data loss for a short period of time, it is undoubtedly best to use RDB. Regularly generating RDB snapshots is very convenient for database backup, and RDB restores data sets faster than AOF, and using RDB can also avoid some hidden bugs of AOF; otherwise, use AOF to rewrite.
However, it is generally recommended not to use one persistence mechanism alone, but to use both together. In this case, when redis restarts, the AOF file will be loaded first to restore the original data, because in general, the data set saved by the AOF file is more complete than the data set saved by the RDB file. Redis may have integrated the two persistence methods into one persistence model in the future.
Publish and Subscribe
Redis publish and subscribe (pub/sub) is a message communication mode: the sender (pub) sends messages and the subscriber (sub) receives messages.
Redis clients can subscribe to any number of channels.
Command
| Sequence number | Command and description |
|---|---|
| 1 | [PSUBSCRIBE pattern pattern …] Subscribe to one or more channels that match the given pattern. |
| 2 | [PUBSUB subcommand argument [argument …]] View the status of the subscription and publishing system. |
| 3 | PUBLISH channel message Send a message to the specified channel. |
| 4 | [PUNSUBSCRIBE pattern [pattern …]] Unsubscribe from all channels with the given pattern. |
| 5 | [SUBSCRIBE channel channel …] Subscribe to the given information of one or more channels. |
| 6 | [UNSUBSCRIBE channel [channel …]] means unsubscribing from a given channel. |
Test
# First redis client, create a subscription channel name runChat
127.0.0.1:6379> SUBSCRIBE runChat

# Open the second redis client and publish the content "Redis publish test"
127.0.0.1:6379> PUBLISH runChat "Redis publish test"
(integer) 1

# The first client automatically displays
1) "message"
2) "runChat"
3) "Redis publish test"